实现一个双向数据绑定的简易MVVM框架
作者:佳明妈 来源:oschina 2017-05-31 人气:用jquery实现一个数据双向绑定
jquery这个神器,依然活跃很多年,未来依然可以活跃很多年,我们这里就用jquery实现一下双向数据绑定。jquery实现双向数据绑定采用DOM事件的订阅和发布机制。jquery实现的原文:https://www.oschina.net/translate/easy-two-way-data-binding-in-javascript
function DataBinder( object_id ) {
  // Use a jQuery object as simple PubSub
  var pubSub = jQuery({});

  // We expect a `data` element specifying the binding
  // in the form: data-bind-<object_id>="<property_name>"
  var data_attr = "bind-" + object_id,
      message = object_id + ":change";

  // Listen to change events on elements with the data-binding attribute and proxy
  // them to the PubSub, so that the change is "broadcasted" to all connected objects
  jQuery( document ).on( "change", "[data-" + data_attr + "]", function( evt ) {
    var $input = jQuery( this );

    pubSub.trigger( message, [ $input.data( data_attr ), $input.val() ] );
  });

  // PubSub propagates changes to all bound elements, setting value of
  // input tags or HTML content of other tags
  pubSub.on( message, function( evt, prop_name, new_val ) {
    jQuery( "[data-" + data_attr + "=" + prop_name + "]" ).each( function() {
      var $bound = jQuery( this );

      if ( $bound.is("input, textarea, select") ) {
        $bound.val( new_val );
      } else {
        $bound.html( new_val );
      }
    });
  });

  return pubSub;
}
对于上面这个实现来说,下面是一个User模型的最简单的实现方法:
function User( uid ) {
  var binder = new DataBinder( uid ),

      user = {
        attributes: {},

        // The attribute setter publish changes using the DataBinder PubSub
        set: function( attr_name, val ) {
          this.attributes[ attr_name ] = val;
          binder.trigger( uid + ":change", [ attr_name, val, this ] );
        },

        get: function( attr_name ) {
          return this.attributes[ attr_name ];
        },

        _binder: binder
      };

  // Subscribe to the PubSub
  binder.on( uid + ":change", function( evt, attr_name, new_val, initiator ) {
    if ( initiator !== user ) {
      user.set( attr_name, new_val );
    }
  });

  return user;
}
现在我们如果想要将User模型属性绑定到UI上,我们只需要将适合的数据特性绑定到对应的HTML元素上。
// javascript
var user = new User( 123 );
user.set( "name", "Wolfgang" );

// html
<input type="number" data-bind-123="name" />
这样输入值会自动映射到user对象的name属性,反之亦然。到此这个简单实现就完成啦!
自己实现一个简易MVVM框架
体验过使用jquery实现一个双向绑定的功能后,我们来研究下,自己实现一个简易MVVM框架我们知道的,常见的数据绑定的实现方法
1、数据劫持(vue):通过Object.defineProperty() 去劫持数据每个属性对应的getter和setter
2、脏值检测(angular):通过特定事件比如input,change,xhr请求等进行脏值检测。
3、发布-订阅模式(backbone):通过发布消息,订阅消息进行数据和视图的绑定监听。具体代码实现可以参考我github个人仓库overwrite->my-observer
一言不合先上代码
<!DOCTYPE html>
<html lang="en">
<head>
  <meta charset="UTF-8">
  <meta name="viewport" content="width=device-width, initial-scale=1.0">
  <meta http-equiv="X-UA-Compatible" content="ie=edge">
  <title>example</title>
  <script src="./mvvm.js" charset="utf-8"></script>
</head>
<body>
  <div id="mvvm">
    <h2>{{b}}</h2>
    <input type="text" x-model="a">
    <input type="text" name="" value="" x-model="a">
    <p x-html="a">{{ a }}</p>
    <button type="button" name="button" x-on:click="testToggle">change b</button>
  </div>
</body>
<script>
var vm = new MVVM({
  el: '#mvvm',
  data: {
    a: 'test model',
    b: 'hello MVVM',
    flag: true
  },
  methods: {
    testToggle: function () {
      this.flag = !this.flag;
      this.b = this.flag ? 'hello MVVM' : 'test success'
    }
  }
});
</script>
</html>
效果图
看完效果图之后,接下来我们直接搞事情吧
一、MVVM框架整体流程图
要实现一个我们自己的mvvm库,我们首先需要做的事情不是写代码,而是整理一下思路,捋清楚之后再动手绝对会让你事半功倍。先上流程图,我们对着流程图来捋思路
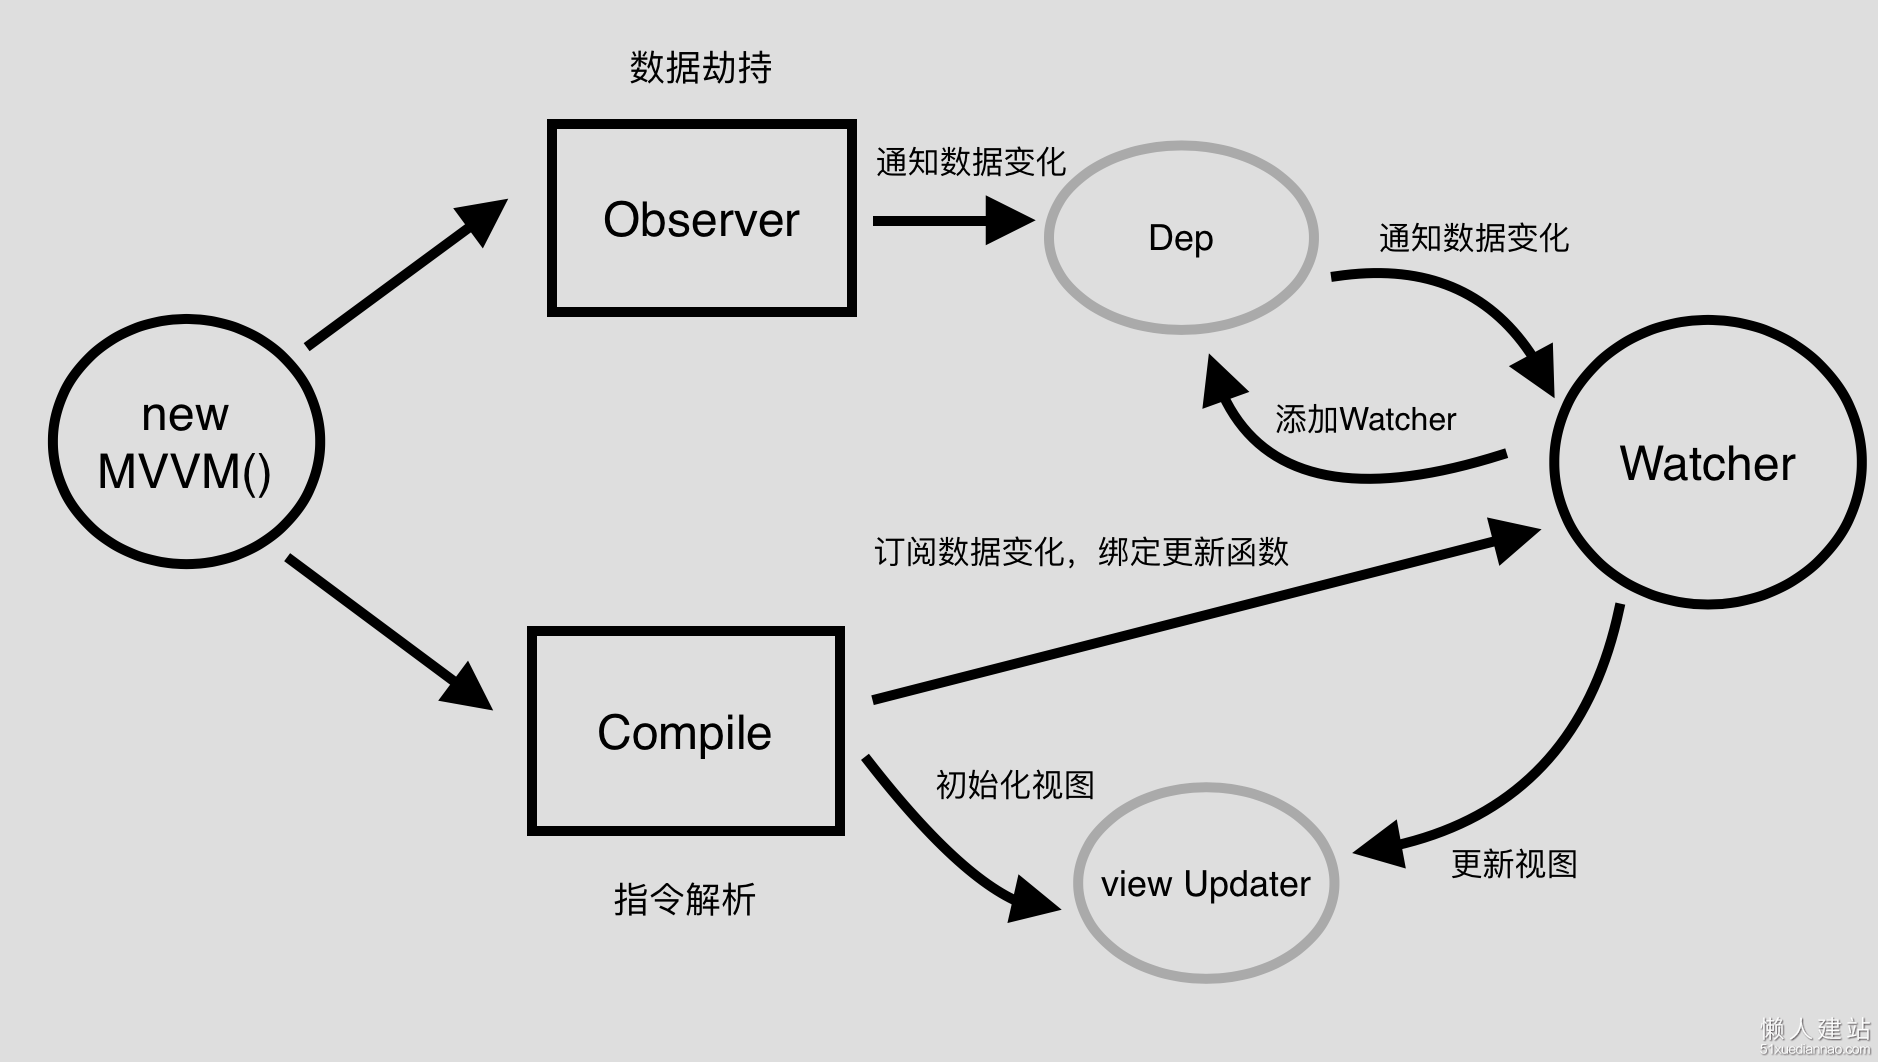
如上图所示,我们可以看到,整体实现分为四步
1、实现一个Observer,对数据进行劫持,通知数据的变化
2、实现一个Compile,对指令进行解析,初始化视图,并且订阅数据的变更,绑定好更新函数
3、实现一个Watcher,将其作为以上两者的一个中介点,在接收数据变更的同时,让Dep添加当前Watcher,并及时通知视图进行update
4、实现MVVM,整合以上三者,作为一个入口函数
二、mvvm框架技术点实现
1、实现Observer
这里我们需要做的事情就是实现数据劫持,并将数据变更给传递下去。那么这里将会用到的方法就是Object.defineProperty()来做这么一件事。先不管三七二十一,咱先用用Object.defineProperty()试试手感。
function observe (data) {
  if (!data || typeof data !== 'object') {
    return;
  }
  Object.keys(data).forEach(key => {
    observeProperty(data, key, data[key])
  })
}
function observeProperty (obj, key, val) {
  observe(val);
  Object.defineProperty(obj, key, {
    enumerable: true,   // 可枚举
    configurable: true, // 可重新定义
    get: function () {
      return val;
    },
    set: function (newVal) {
      if (val === newVal || (newVal !== newVal && val !== val)) {
        return;
      }
      console.log('数据更新啦 ', val, '=>', newVal);
      val = newVal;
    }
  });
}
调用
var data = {
  a: 'hello'
}
observe(data);
效果如下

看完是不是发现JavaScript提供给我们的Object.defineProperty()方法功能巨强大巨好用呢。
其实到这,我们已经算是完成了数据劫持,完整的Observer则需要将数据的变更传递给Dep实例,然后接下来的事情就丢给Dep去通知下面完成接下来的事情了,完整代码如下所示
/**
 * @class 发布类 Observer that are attached to each observed
 * @param {[type]} value [vm参数]
  * 懒人建站http://www.51xuediannao.com/ 整理发布
 */
 function observe(value, asRootData) {
   if (!value || typeof value !== 'object') {
     return;
   }
   return new Observer(value);
 }

function Observer(value) {
  this.value = value;
  this.walk(value);
}

Observer.prototype = {
  walk: function (obj) {
    let self = this;
    Object.keys(obj).forEach(key => {
      self.observeProperty(obj, key, obj[key]);
    });
  },
  observeProperty: function (obj, key, val) {
    let dep = new Dep();
    let childOb = observe(val);
    Object.defineProperty(obj, key, {
      enumerable: true,
      configurable: true,
      get: function() {
        if (Dep.target) {
          dep.depend();
        }
        if (childOb) {
          childOb.dep.depend();
        }
        return val;
      },
      set: function(newVal) {
        if (val === newVal || (newVal !== newVal && val !== val)) {
          return;
        }
        val = newVal;
        // 监听子属性
        childOb = observe(newVal);
        // 通知数据变更
        dep.notify();
      }
    })
  }
}
/**
 * @class 依赖类 Dep
 */
let uid = 0;
function Dep() {
  // dep id
  this.id = uid++;
  // array 存储Watcher
  this.subs = [];
}
Dep.target = null;
Dep.prototype = {
  /**
   * [添加订阅者]
   * @param  {[Watcher]} sub [订阅者]
   */
  addSub: function (sub) {
    this.subs.push(sub);
  },
  /**
   * [移除订阅者]
   * @param  {[Watcher]} sub [订阅者]
   */
  removeSub: function (sub) {
    let index = this.subs.indexOf(sub);
    if (index !== -1) {
      this.subs.splice(index ,1);
    }
  },
  // 通知数据变更
  notify: function () {
    this.subs.forEach(sub => {
      // 执行sub的update更新函数
      sub.update();
    });
  },
  // add Watcher
  depend: function () {
    Dep.target.addDep(this);
  }
}
// 结合Watcher
/**
* Watcher.prototype = {
*   get: function () {
*     Dep.target = this;
*     let value = this.getter.call(this.vm, this.vm);
*     Dep.target = null;
*     return value;
*   },
*   addDep: function (dep) {
*     dep.addSub(this);
*   }
* }
*/
至此,我们已经实现了数据的劫持以及notify数据变化的功能了。
2、实现Compile
按理说我们应该紧接着实现Watcher,毕竟从上面代码看来,Observer和Watcher关联好多啊,但是,我们在捋思路的时候也应该知道了,Watcher和Compile也是有一腿的哦。所以咱先把Compile也给实现了,这样才能更好的让他们3P。
Compile需要做的事情也很简单
a、解析指令,将指令模板中的变量替换成数据,对视图进行初始化操作
b、订阅数据的变化,绑定好更新函数
c、接收到数据变化,通知视图进行view update
咱先试着写一个简单的指令解析方法,实现解析指令初始化视图。
js部分
function Compile (el, value) {
  this.$val = value;
  this.$el = this.isElementNode(el) ? el : document.querySelector(el);
  if (this.$el) {
    this.compileElement(this.$el);
  }
}
Compile.prototype = {
  compileElement: function (el) {
    let self = this;
    let childNodes = el.childNodes;
    [].slice.call(childNodes).forEach(node => {
      let text = node.textContent;
      let reg = /{{((?:.|
)+?)}}/;
      // 如果是element节点
      if (self.isElementNode(node)) {
        self.compile(node);
      }
      // 如果是text节点
      else if (self.isTextNode(node) && reg.test(text)) {
        // 匹配第一个选项
        self.compileText(node, RegExp.$1.trim());
      }
      // 解析子节点包含的指令
      if (node.childNodes && node.childNodes.length) {
        self.compileElement(node);
      }
    })
  },
  // 指令解析
  compile: function (node) {
    let nodeAttrs = node.attributes;
    let self = this;

    [].slice.call(nodeAttrs).forEach(attr => {
      var attrName = attr.name;
      if (self.isDirective(attrName)) {
        var exp = attr.value;
        node.innerHTML = typeof this.$val[exp] === 'undefined' ? '' : this.$val[exp];
        node.removeAttribute(attrName);
      }
    });
  },
  // {{ test }} 匹配变量 test
  compileText: function (node, exp) {
    node.textContent = typeof this.$val[exp] === 'undefined' ? '' : this.$val[exp];
  },
  // element节点
  isElementNode: function (node) {
    return node.nodeType === 1;
  },
  // text纯文本
  isTextNode: function (node) {
    return node.nodeType === 3
  },
  // x-XXX指令判定
  isDirective: function (attr) {
    return attr.indexOf('x-') === 0;
  }
}
html部分
<body>
<div id="test">
  <h2 x-html="a"></h2>
  <p>{{ a }}</p>
</div>
</body>
<script>
var data = {
  a: 'hello'
}
new Compile('#test', data)
</script>
结果如图所示
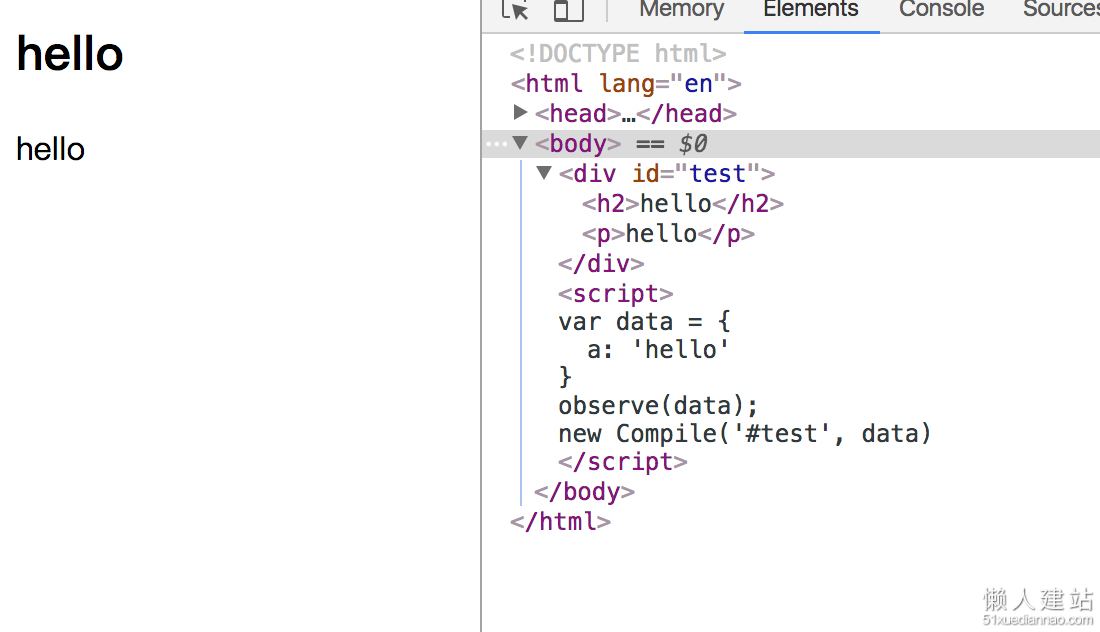
按照步骤走的我已经实现了指令解析!
这里我们只是实现了指令的解析以及视图的初始化,并没有实现数据变化的订阅以及视图的更新。完整的Compile则实现了这些功能,详细代码如下
/**
 * @class 指令解析类 Compile
 * @param {[type]} el [element节点]
 * @param {[type]} vm [mvvm实例]
 */
function Compile(el, vm) {
  this.$vm = vm;
  this.$el = this.isElementNode(el) ? el : document.querySelector(el);

  if (this.$el) {
    this.$fragment = this.nodeFragment(this.$el);
    this.compileElement(this.$fragment);
    // 将文档碎片放回真实dom
    this.$el.appendChild(this.$fragment)
  }
}
Compile.prototype = {
  compileElement: function (el) {
    let self = this;
    let childNodes = el.childNodes;
    [].slice.call(childNodes).forEach(node => {
      let text = node.textContent;
      let reg = /{{((?:.|
)+?)}}/;

      // 如果是element节点
      if (self.isElementNode(node)) {
        self.compile(node);
      }
      // 如果是text节点
      else if (self.isTextNode(node) && reg.test(text)) {
        // 匹配第一个选项
        self.compileText(node, RegExp.$1);
      }
      // 解析子节点包含的指令
      if (node.childNodes && node.childNodes.length) {
        self.compileElement(node);
      }
    });
  },
  // 文档碎片,遍历过程中会有多次的dom操作,为提高性能我们会将el节点转化为fragment文档碎片进行解析操作
  // 解析操作完成,将其添加回真实dom节点中
  nodeFragment: function (el) {
    let fragment = document.createDocumentFragment();
    let child;

    while (child = el.firstChild) {
      fragment.appendChild(child);
    }
    return fragment;
  },
  // 指令解析
  compile: function (node) {
    let nodeAttrs = node.attributes;
    let self = this;

    [].slice.call(nodeAttrs).forEach(attr => {
      var attrName = attr.name;
      if (self.isDirective(attrName)) {
        var exp = attr.value;
        var dir = attrName.substring(2);
        // 事件指令
        if (self.isEventDirective(dir)) {
          compileUtil.eventHandler(node, self.$vm, exp, dir);
        }
        // 普通指令
        else {
          compileUtil[dir] && compileUtil[dir](node, self.$vm, exp);
        }

        node.removeAttribute(attrName);
      }
    });
  },
  // {{ test }} 匹配变量 test
  compileText: function (node, exp) {
    compileUtil.text(node, this.$vm, exp);
  },
  // element节点
  isElementNode: function (node) {
    return node.nodeType === 1;
  },
  // text纯文本
  isTextNode: function (node) {
    return node.nodeType === 3
  },
  // x-XXX指令判定
  isDirective: function (attr) {
    return attr.indexOf('x-') === 0;
  },
  // 事件指令判定
  isEventDirective: function (dir) {
    return dir.indexOf('on') === 0;
  }
}
// 定义$elm,缓存当前执行input事件的input dom对象
let $elm;
let timer = null;
// 指令处理集合
const compileUtil = {
  html: function (node, vm, exp) {
    this.bind(node, vm, exp, 'html');
  },
  text: function (node, vm, exp) {
    this.bind(node, vm, exp, 'text');
  },
  class: function (node, vm, exp) {
    this.bind(node, vm, exp, 'class');
  },
  model: function(node, vm, exp) {
    this.bind(node, vm, exp, 'model');

    let self = this;
    let val = this._getVmVal(vm, exp);
    // 监听input事件
    node.addEventListener('input', function (e) {
      let newVal = e.target.value;
      $elm = e.target;
      if (val === newVal) {
        return;
      }
      // 设置定时器  完成ui js的异步渲染
      clearTimeout(timer);
      timer = setTimeout(function () {
        self._setVmVal(vm, exp, newVal);
        val = newVal;
      })
    });
  },
  bind: function (node, vm, exp, dir) {
    let updaterFn = updater[dir + 'Updater'];

    updaterFn && updaterFn(node, this._getVmVal(vm, exp));

    new Watcher(vm, exp, function(value, oldValue) {
      updaterFn && updaterFn(node, value, oldValue);
    });
  },
  // 事件处理
  eventHandler: function(node, vm, exp, dir) {
    let eventType = dir.split(':')[1];
    let fn = vm.$options.methods && vm.$options.methods[exp];

    if (eventType && fn) {
      node.addEventListener(eventType, fn.bind(vm), false);
    }
  },
  /**
   * [获取挂载在vm实例上的value]
   * @param  {[type]} vm  [mvvm实例]
   * @param  {[type]} exp [expression]
   */
  _getVmVal: function (vm, exp) {
    let val = vm;
    exp = exp.split('.');
    exp.forEach(key => {
      key = key.trim();
      val = val[key];
    });
    return val;
  },
  /**
   * [设置挂载在vm实例上的value值]
   * @param  {[type]} vm    [mvvm实例]
   * @param  {[type]} exp   [expression]
   * @param  {[type]} value [新值]
   */
  _setVmVal: function (vm, exp, value) {
    let val = vm;
    exps = exp.split('.');
    exps.forEach((key, index) => {
      key = key.trim();
      if (index < exps.length - 1) {
        val = val[key];
      }
      else {
        val[key] = value;
      }
    });
  }
}
// 指令渲染集合
const updater = {
  htmlUpdater: function (node, value) {
    node.innerHTML = typeof value === 'undefined' ? '' : value;
  },
  textUpdater: function (node, value) {
    node.textContent = typeof value === 'undefined' ? '' : value;
  },
  classUpdater: function () {},
  modelUpdater: function (node, value, oldValue) {
    // 不对当前操作input进行渲染操作
    if ($elm === node) {
      return false;
    }
    $elm = undefined;
    node.value = typeof value === 'undefined' ? '' : value;
  }
}
好了,到这里两个和Watcher相关的“菇凉”已经出场了
3、实现Watcher
作为一个和Observer和Compile都有关系的“蓝银”,他做的事情有以下几点
a、通过Dep接收数据变动的通知,实例化的时候将自己添加到dep中
b、属性变更时,接收dep的notify,调用自身update方法,触发Compile中绑定的更新函数,进而更新视图
这里的代码比较简短,所以我决定直接上代码
/**
 * @class 观察类
 * @param {[type]}   vm      [vm对象]
 * @param {[type]}   expOrFn [属性表达式]
 * @param {Function} cb      [回调函数(一半用来做view动态更新)]
 */
function Watcher(vm, expOrFn, cb) {
  this.vm = vm;
  expOrFn = expOrFn.trim();
  this.expOrFn = expOrFn;
  this.cb = cb;
  this.depIds = {};

  if (typeof expOrFn === 'function') {
    this.getter = expOrFn
  }
  else {
    this.getter = this.parseGetter(expOrFn);
  }
  this.value = this.get();
}
Watcher.prototype = {
  update: function () {
    this.run();
  },
  run: function () {
    let newVal = this.get();
    let oldVal = this.value;
    if (newVal === oldVal) {
      return;
    }
    this.value = newVal;
    // 将newVal, oldVal挂载到MVVM实例上
    this.cb.call(this.vm, newVal, oldVal);
  },
  get: function () {
    Dep.target = this;  // 将当前订阅者指向自己
    let value = this.getter.call(this.vm, this.vm); // 触发getter,将自身添加到dep中
    Dep.target = null;  // 添加完成 重置
    return value;
  },
  // 添加Watcher to Dep.subs[]
  addDep: function (dep) {
    if (!this.depIds.hasOwnProperty(dep.id)) {
      dep.addSub(this);
      this.depIds[dep.id] = dep;
    }
  },
  parseGetter: function (exp) {
    if (/[^w.$]/.test(exp)) return;

    let exps = exp.split('.');

    // 简易的循环依赖处理
    return function(obj) {
        for (let i = 0, len = exps.length; i < len; i++) {
            if (!obj) return;
            obj = obj[exps[i]];
        }
        return obj;
    }
  }
}
没错就是Watcher这么一个简短的“蓝银”和Observer和Compile两位“菇凉”牵扯不清
4、实现MVVM部分
可以说MVVM是Observer,Compile以及Watcher的“boss”了,他才不会去管他们员工之间的关系,只要他们三能给干活,并且干好活就行。他需要安排给Observer,Compile以及Watche做的事情如下
a、Observer实现对MVVM自身model数据劫持,监听数据的属性变更,并在变动时进行notify
b、Compile实现指令解析,初始化视图,并订阅数据变化,绑定好更新函数
c、Watcher一方面接收Observer通过dep传递过来的数据变化,一方面通知Compile进行view update
具体实现如下
/**
 * @class 双向绑定类 MVVM
 * @param {[type]} options [description]
 */
function MVVM (options) {
  this.$options = options || {};
  let data = this._data = this.$options.data;
  let self = this;

  Object.keys(data).forEach(key => {
    self._proxyData(key);
  });
  observe(data, this);
  new Compile(options.el || document.body, this);
}
MVVM.prototype = {
  /**
   * [属性代理]
   * @param  {[type]} key    [数据key]
   * @param  {[type]} setter [属性set]
   * @param  {[type]} getter [属性get]
   */
  _proxyData: function (key, setter, getter) {
    let self = this;
    setter = setter ||
    Object.defineProperty(self, key, {
      configurable: false,
      enumerable: true,
      get: function proxyGetter() {
        return self._data[key];
      },
      set: function proxySetter(newVal) {
        self._data[key] = newVal;
      }
    })
  }
}
至此,一个属于我们自己的mvvm库也算是完成了。由于本文的代码较多,又不太好分小部分抽离出来讲解,所以我将代码的解析都直接写到了代码中。文中一些不够严谨的思考和错误,还请各位小伙伴们拍砖指出,大家一起纠正一起学习。
实现一个双向数据绑定的简易MVVM框架由懒人建站收集整理,您可以自由传播,请主动带上本文链接
懒人建站就是免费分享,觉得有用就多来支持一下,没有能帮到您,懒人也只能表示遗憾,希望有一天能帮到您。


实现一个双向数据绑定的简易MVVM框架-最新评论